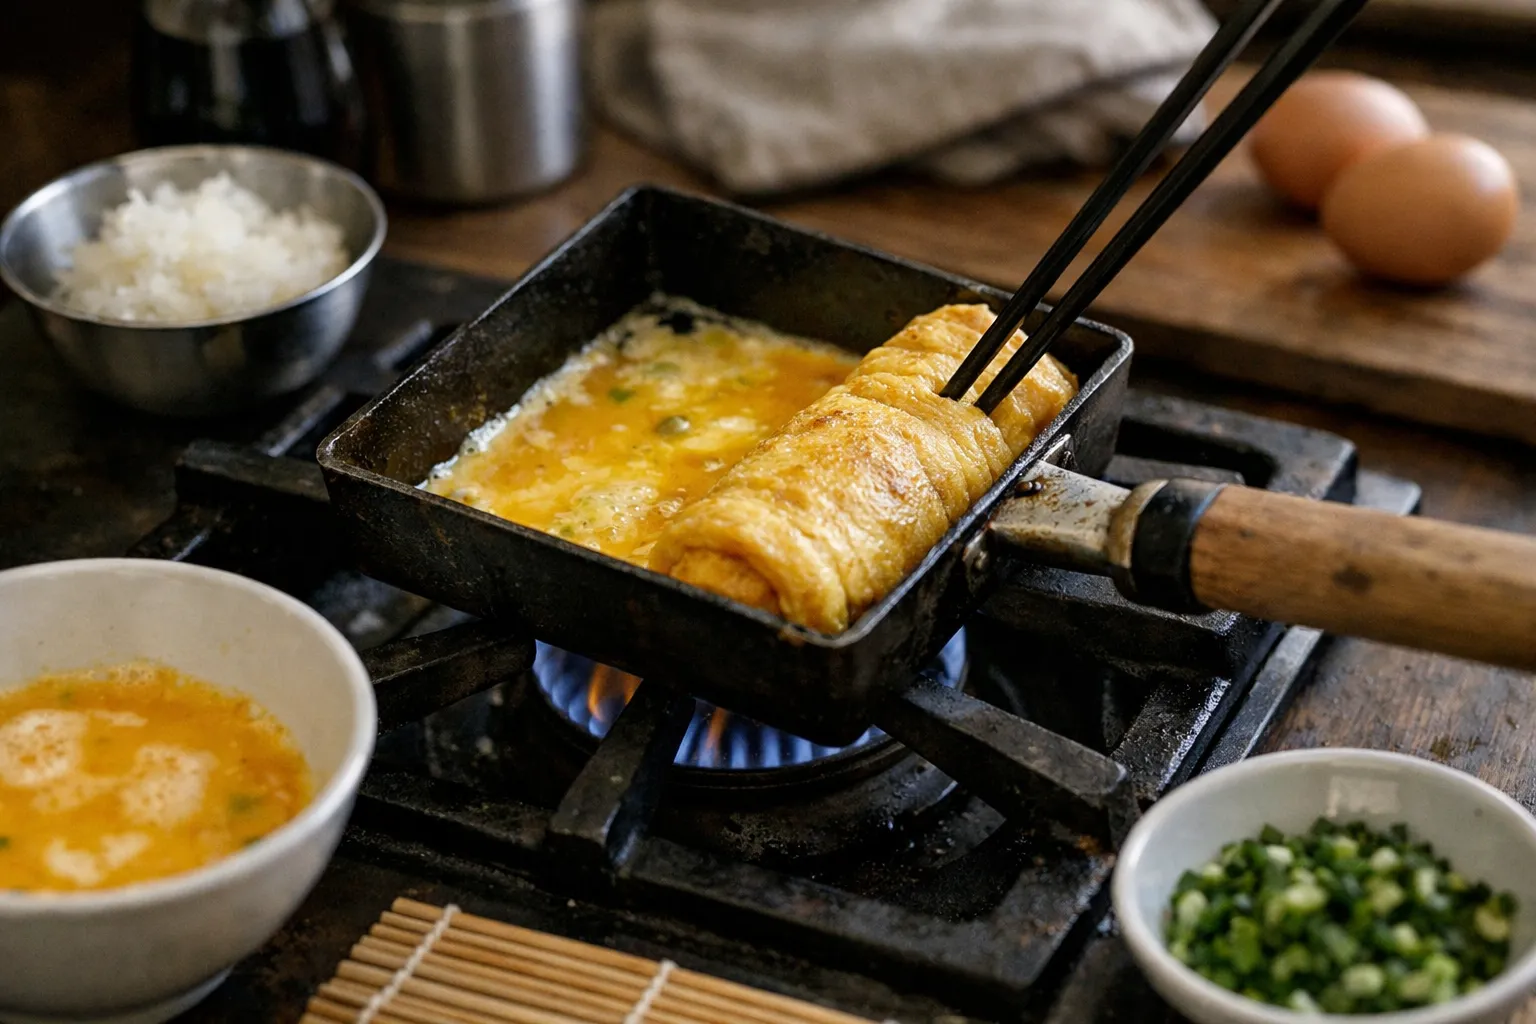
There’s a quiet satisfaction in slicing a glossy, layered tamagoyaki — the Japanese rolled omelet that balances sweet and savory with a silky interior. This updated guide (Sept 2026) keeps the original 15-minute stovetop approach but adds current equipment recommendations, metric conversions, product notes from the plant-based market, and the latest food-safety and storage practices so you can make consistent restaurant-style tamagoyaki at home.
Why this guide — and who it’s for
This is for recipe enthusiasts who want reproducible results on a regular stovetop (no specialty makiyakinabe required). Since the original July 2026 edition, several small but practical shifts matter: more widely available rectangular pans and compact electric griddles, mainstream plant-based liquid eggs (useful for vegan rolls), and clearer refrigeration guidance endorsed by food-safety authorities. You’ll get step-by-step technique, metric and volume measures, equipment options for 2026 kitchens, and troubleshooting targeted to common home-cook pain points.
Prerequisites / Context
- Basic stovetop skills: controlling medium-low heat and pouring thin layers.
- Equipment options: a rectangular tamagoyaki pan is ideal; an 20–25 cm (8–10") round nonstick skillet works too.
- Food-safety note: refrigerate cooked egg dishes within 2 hours and use within 3 days (USDA guidance consistent through 2026).
Overview at a glance
- Prep time: 8–10 minutes
- Cook time: 8–12 minutes (practice-dependent)
- Total: 16–22 minutes
- Yield: One roll, serves 3–4 as part of a meal
- Method: Pan-layer rolling; thin pours, quick roll, repeat
Ingredients (classic tamagoyaki — metric)
- 4 large eggs (200–220 g total)
- 25 g (2 tbsp) granulated sugar — reduce to 6–12 g (1–1½ tsp) for less sweet
- 15 ml (1 tbsp) mirin, or 12 ml rice vinegar + 2.5 g sugar as substitute
- 15 ml (1 tbsp) light soy sauce (use gluten-free tamari if needed)
- 15 ml dashi (liquid) or 15 ml water + 0.25 g instant dashi
- Pinch (about 0.5 g) fine salt
- 10–20 ml neutral oil for pan (vegetable, canola, or grapeseed)
Optional: 1 tbsp finely chopped scallion, 1 tsp grated ginger, or a small handful (30–40 g) cooked, squeezed spinach.
Updated equipment notes (2026)
- Rectangular tamagoyaki pan (18×12 cm or similar) — widely available at kitchenware retailers and online.
- 8–10" (20–25 cm) nonstick skillet if you don’t have a rectangular pan.
- Compact electric griddles and induction-compatible tamagoyaki pans are now common; they offer steadier low heat for consistent layers.
- Chopsticks or a thin spatula; bamboo sushi mat or clean towel to shape the roll.
- Paper towel and tongs for oiling the pan to control the oil film.
Step-by-step cooking method
Read once, set up mise en place, then cook. Each step explains the why so you can adapt to your pan and stove.
-
Measure and whisk.
Crack eggs into a shallow bowl. Add sugar, mirin, soy sauce, dashi and salt. Whisk gently until uniform—aim to blend ingredients without aerating. Why: excess foam creates bubbles and holes in the finished roll; smooth mixture yields a glossy surface and tight layers.
-
Preheat and oil the pan.
Heat the pan over medium-low. If you have a thermometer, the pan surface should feel warm—roughly 120–150°C (250–300°F) at the center; many home cooks set to a low-to-medium-low burner setting and test with a small drop of egg to check reaction. Oil a paper towel and wipe a thin film across the surface. Why: a consistent thin oil layer prevents sticking while avoiding pooled oil that disrupts thin layers.
-
Pour a thin first layer (about 30–45 ml).
Pour enough egg to create a thin sheet that just covers the pan (roughly 2–3 tbsp in a rectangular pan). Tilt the pan to spread. Let it set until edges firm and the surface looks matte but still slightly glossy — about 30–45 seconds. Why: thin layers set quickly and roll without tearing; thicker first layers can trap steam and break.
-
Roll toward the far side.
Using chopsticks or a thin spatula, lift one edge and roll the sheet away from you toward the far side in a tight spiral. Slide the roll back to the near side. Why: placing the roll near you creates a base for subsequent layers and keeps the process ergonomic.
-
Re-oil and pour the next layer.
Lightly oil the exposed pan. Pour enough egg so it runs under and around the existing roll — this bonds layers. Let set, then roll the entire mass toward the far side again. Repeat until the mixture is used (typically 3–5 layers). Why: pouring while the previous roll is still warm helps adhesion; underpouring prevents bonding, overpouring makes the roll too thick and slow-cooking.
-
Finish, press, and shape.
On the final roll, press gently to compact into a straight-sided rectangle. Transfer to a cutting board. For sharper edges, wrap briefly in a bamboo sushi mat or clean towel and hold for 1–2 minutes. Why: gentle compression sets the shape without squeezing out moisture that keeps the interior tender.
-
Slice and serve.
Use a sharp knife; wipe the blade between cuts to keep slices clean. Aim for 1.5–2 cm (¾") slices. Serve warm, room temperature, or chilled as part of bento. Why: slicing while slightly warm gives neat edges; fully chilled rolls are firmer but can be harder to slice thinly.
Timing and temperature tips
- Heat control is paramount: medium-low on most home stoves is the target. If layers brown quickly, drop heat.
- Each layer usually sets in 30–45 seconds; adjust depending on pan size and pour volume.
- Electric griddles and induction cooktops (common in 2026 kitchens) yield steadier low-heat control and reduce hot spots on cheaper pans.
Common mistakes (and how to avoid them)
- Layers separating: Cause — pouring cold egg onto a cold roll or not letting egg flow under the roll. Fix — keep the roll warm in the pan and pour enough egg so it contacts the base of the roll.
- Air holes or spongy texture: Cause — over-whisking/over-aerating. Fix — whisk only to uniformity; strain the mixture if it seems foamy.
- Sticking and tearing: Cause — inadequate nonstick surface or insufficient oil. Fix — use a good nonstick pan (PFOA-free ceramic or high-quality PTFE), maintain a thin oil film each pass.
- Overbrowning: Cause — pan too hot. Fix — lower heat; use the "test drop" method to calibrate your burner.
Pro tips (2026 updates)
- Metric precision helps: weigh sugar and liquids for consistency on repeat attempts.
- For very even layers, pour with a small ladle and tilt the pan to spread before the surface sets.
- If you want uniformly square edges, use a clean metal bench scraper to compress edges briefly while wrapping in a mat.
- Plant-based liquid eggs (mung-bean or mung-derived products like some commercial brands) have become more heat-stable by 2026; they can be used straight from the carton and layered like eggs but test a small roll first because formulations vary.
- For a lighter roll, substitute one or two eggs with egg whites (reduce seasoning slightly) — increases volume and reduces cholesterol per serving.
Dietary modifications (refreshed)
Vegan tamagoyaki — updated options
Two reliable vegan approaches remain:
- Chickpea-flour batter: 120 g chickpea flour + 300 ml water, 2 tbsp nutritional yeast, 1 tsp kala namak (for eggy sulfur), 15 ml mirin, 15 ml tamari. Rest 10 minutes before using. Texture: holds layers well but slightly denser.
- Silken tofu blend: 340 g silken tofu + 15 g cornstarch, 15 ml tamari, 15 ml mirin, pinch kala namak. Blend very smooth, strain if necessary. Cook gently; softer texture needs careful handling when rolling.
Commercial plant-based liquid eggs (mung-bean or other legume-based) are widely available in refrigerated sections in many markets by 2026; they can simplify the process—shake, season, and pour — but try a small test roll first for texture and seasoning adjustments.
Gluten-free
Use tamari labeled gluten-free and verify any mirin or rice vinegar label. Most other ingredients are naturally gluten-free; always check packaged dashi or instant seasonings.
Low-sodium
Use low-sodium tamari or soy, reduce added salt, and enhance umami with a small pinch of powdered dashi or mushroom powder. Balance sweetness by trimming sugar by half and tasting for preference.
Make-ahead, storage, and reheating (updated for 2026)
- Storage: Cool to room temperature, wrap tightly and refrigerate within 2 hours. Eat within 3 days.
- Freezing: Still not recommended: texture changes and moisture loss degrade the delicate layers.
- Reheating: Warm gently in a nonstick skillet over low heat for 30–60 seconds per side or microwave 10–20 seconds with a damp paper towel cover. High heat makes eggs rubbery.
Serving ideas and modern uses (2026)
- Classic: sliced with grated daikon and ponzu for brightness.
- Bento: pre-sliced tamagoyaki remains a top bento protein for meal-prep enthusiasts—pair with pickles, rice and seasonal veg.
- Brunch fusion: tamagoyaki slices on toasted sourdough with herb cream cheese and microgreens for a contemporary brunch plate.
- Sushi: use thin slices on nigiri or rolled into maki as an easy home-sushi component.
Why this matters now
By late 2026, home cooking continues to blend convenience with technique: better cookware, more reliable plant-based egg substitutes, and a stronger interest in low-effort meal-prep have made tamagoyaki an appealing, versatile dish. This guide gives reproducible steps and updated equipment and ingredient notes so you can succeed on the first few attempts and adapt the roll for dietary needs.
Practice makes perfect
Expect your first roll to be a learning step. Focus on heat control, thin even pours, and gentle rolling. With three or four tries you’ll build the rhythm — pour, set, roll, return, oil, pour — and produce glossy, layered tamagoyaki reliably.
Troubleshooting and quick fixes
- If the roll is too soft and falls apart: reduce pour volume per layer or briefly increase heat to set layers faster (but avoid browning).
- If the roll browns excessively: lower heat and ensure your pan doesn’t have hot spots; rotate the pan on your burner between layers to even out heat.
- If vegan versions tear: let each layer set a bit longer and use a wider spatula when rolling to support the softer matrix.
FAQ
Can I make tamagoyaki on induction cooktops?
Yes. Use an induction-compatible rectangular pan or a flat induction griddle. Induction gives precise low-heat control, which helps prevent browning and produces more consistent layers.
How do I reduce sweetness without losing texture?
Reduce sugar to 1–1½ tsp (4–6 g) in the 4-egg base and compensate with a small splash more mirin or ½ tsp dashi powder for umami. Taste and adjust over subsequent attempts.
Is it safe to use commercial plant-based liquid eggs for tamagoyaki?
Yes — many commercial formulations (mung-bean or pea-based) are formulated for cooking and work as direct substitutes. Because formulations vary, test a small roll first to check heat behavior and seasoning needs.
Why are my tamagoyaki layers separating after cooling?
Usually because the final layer didn’t sufficiently bond with the previous one. Ensure the previous roll is warm when you pour the next layer and pour enough liquid to reach under and around the roll so layers fuse as they cook.
Can I bake tamagoyaki in the oven?
Baking changes the texture and won’t create the layered roll; however, you can make an oven custard-style egg (dashimaki-style) in a shallow pan for an easier, sliceable alternative but it’s a different product than rolled tamagoyaki.